Cool Business Card

Making a Cooler Business Card
by ch00f via ch00ftech

New and Improved

If you've been following my blog, you probably read up on my last attempt at creating a cooler business card. The basic concept was to design a small circuit that when connected to a computer via USB will emulate a mouse and draw out a design. This utilized the ATTiny 85 and VUSB platform which makes writing USB peripherals very easy.

The problem with the original design was that I was controlling the mouse in an open loop manner. I was telling the mouse cursor which way to go, but I had no way to read back the cursor's position. I couldn't account for minor inaccuracies brought about by things like mouse acceleration settings, and the design ended up getting distorted.

After writing that post, I realized that it's possible to configure a mouse to be an absolute input device. An absolute input device is something like a graphics tablet where the device selects precisely where the mouse cursor should go.
Firmware

Most major operating systems will include drivers for so called "generic" human interface devices. This way you never get stuck with a "press any key to install keyboard driver" when you plug in a keyboard. The OS has the driver built in for most basic functions.

These basic functions are defined by the USB spec and cover common things like mouse and keyboard as well as less common peripherals like USB audio and MIDI devices. What I didn't know last time was that they also cover absolute input devices.

This is all specified by the USB device descriptor. A device descriptor is just a series of bytes that are sent to the host machine when a USB device is connected. This includes information such as the device type (mouse, keyboard, etc) as well as info like the manufacturer (USB-licensed manufacturers need to pay for their specific manufacturer IDs. My card just "borrows" one from Logitech).

I don't know anything about the physical aspects of sending a device descriptor, but fortunately, the VUSB firmware that I based my card on handles all of that and only requires that I specify a descriptor array. If you're interested in how this works, I recommend reading their code/documentation.

USB descriptors are literally just a series of bytes, so you need to put them in a very specific order for it to work. I'm not going to go into a whole lot of detail, but I will show you the descriptors I used:

0x05, 0x01,                    // USAGE_PAGE (Generic Desktop)
0x09, 0x02,                    // USAGE (Mouse)
0xa1, 0x01,                    // COLLECTION (Application)
0x09, 0x01,                    //   USAGE (Pointer)
0xa1, 0x00,                    //   COLLECTION (Physical)
0x05, 0x09,                    //     USAGE_PAGE (Button)
0x19, 0x01,                    //     USAGE_MINIMUM (Button 1)
0x29, 0x03,                    //     USAGE_MAXIMUM (Button 3)
0x15, 0x00,                    //     LOGICAL_MINIMUM (0)
0x25, 0x01,                    //     LOGICAL_MAXIMUM (1)
0x95, 0x03,                    //     REPORT_COUNT (3)
0x75, 0x01,                    //     REPORT_SIZE (1)
0x81, 0x02,                    //     INPUT (Data,Var,Abs)
0x95, 0x01,                    //     REPORT_COUNT (1)
0x75, 0x05,                    //     REPORT_SIZE (5)
0x81, 0x03,                    //     INPUT (Cnst,Var,Abs)
0x05, 0x01,                    //     USAGE_PAGE (Generic Desktop)
0x09, 0x30,                    //     USAGE (X)
0x09, 0x31,                    //     USAGE (Y)
0x35, 0x00,                    //     PHYSICAL_MINIMUM (0)
0x46, 0x9d, 0x0b,              //     PHYSICAL_MAXIMUM (2973)
0x15, 0x00,                    //     LOGICAL_MINIMUM (0)
0x26, 0x9d, 0x0b,              //     LOGICAL_MAXIMUM (2973)
0x65, 0x11,                    //     UNIT (SI Lin:Distance)
0x55, 0x0e,                    //     UNIT_EXPONENT (-2)
0x75, 0x10,                    //     REPORT_SIZE (16)
0x95, 0x02,                    //     REPORT_COUNT (2)
0x81, 0x02,                    //     INPUT (Data,Var,Abs)
0xc0,                          //   END_COLLECTION
0xc0                           // END_COLLECTION

The key to this whole operation is where it says INPUT (Data, Var, Abs). Those two bytes (0x81, 0x02) specify that this will be an absolute input device. Of course, reporting absolute position is very different from reporting relative movement.

For starters, when a normal mouse sends information to the host machine, it only needs to send how far the mouse has moved since the last update. This can easily be reported in a single signed byte as it updates very frequently, so distances are short.

Mapping the absolute position of the mouse however requires a lot more data if it's going to provide enough resolution for normal tasks. This is why the "REPORT_SIZE" is set to 0x10. This specifies that each report will be 16 bits in length.

With this configuration, the cursor's location will be specified with two 16 bit numbers. The size of the coordinate plane on which the cursor's location is specified is determined by the "LOGICAL_MAXIMUM" AND "LOGICAL_MINIMUM" values. The larger these numbers, the finer control you have over the mouse cursor. The numbers I used were mostly arbitrary. As long as they're larger than a typical monitor's resolution, you should be good.

One thing I noticed while playing around is that the coordinate plane actually overscans the display. This means that the cursor can actually be told to go beyond the edge of the monitor. I'm not exactly sure why this is the case, and I don't think it's even consistent between displays and operating systems. In my case, the coordinate system overscanned the edge of the display by about 300 units in every direction.

Taking that into account, the coordinate plane looked something like this:


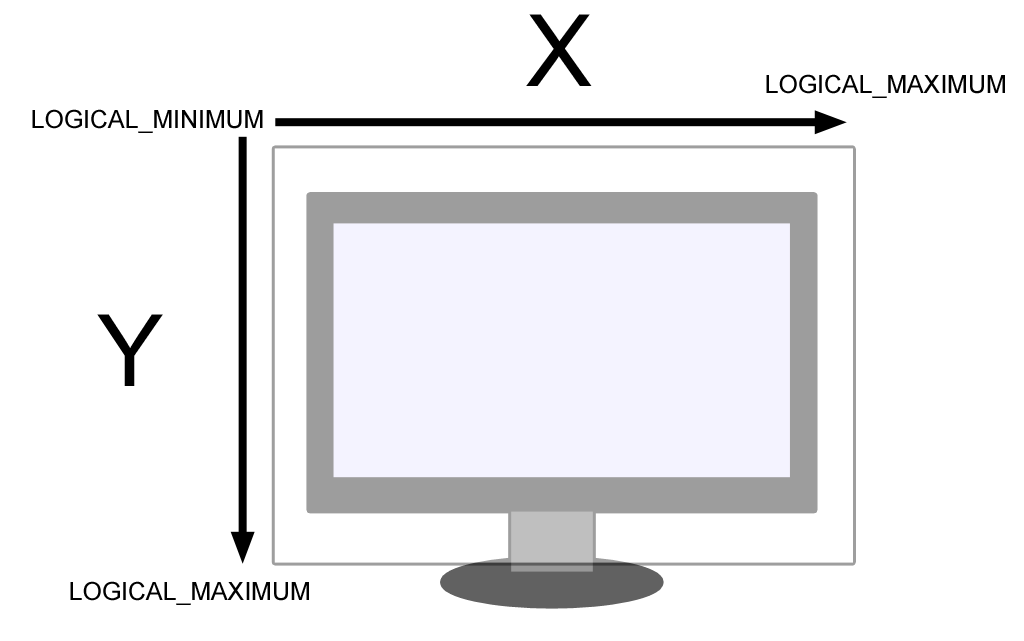
The good news is that as long as my design is relatively small and centered in the coordinate plane, it'll make it onto the usable portion of the plane. What's also convenient is that these coordinate planes scale to the size of the screen, so it should work on anything from a netbook to a 30" monitor.
Artwork

To generate my design, I wrote a quick and dirty Python script that lets me click on an image and record the coordinates of my clicks. I designed the card's firmware so that two clicks at the same exact coordinates causes the firmware to toggle the status of the left click button. This way I just needed to double click at the beginning and end of every line I wanted to draw.

The script also split up each 16 bit coordinate into two 8 bit bytes because the AVR has an 8 bit processor and is only able to store single byte blocks in its program memory. Furthermore, you can only index 256 bytes in a single program memory array, so I had to split my design into two separate stacks of arrays that were each less than 256 bytes long.

This left me with 8 arrays:
  • Low byte of X for first half of design
  • High byte of X for first half of design
  • Low byte of Y for first half of design
  • High byte of Y for first half of design
  • Low byte of X for second half of design
  • High byte of X for second half of design
  • Low byte of Y for second half of design
  • High byte of Y for second half of design

Edit: I just remembered that AVR-GCC supports multi-dimensional program space arrays. This means that I could have just defined a 256x8 array rather than 8 separate arrays. This is the solution I used to store color mixtures in my DJ Jacket. In the end, the assembled code looks more or less the same, but I could have cleaned up my C code a bit and made this solution more scalable for larger designs.

Once compiled, the code was only slightly larger than 4 kbytes. The ATTiny 85 has 8K of memory, so I could actually make a much more sophisticated design in the future.

This process of clicking can get pretty exhausting, so I was prone to make mistakes. To help with this, I wrote another Python script that converts my mouse clicks back into an image, so I can make adjustments without having to actually flash the business card. I'm sure a more capable coder could write a script to generate this data automatically, but I'm a hardware guy, so...
Hardware


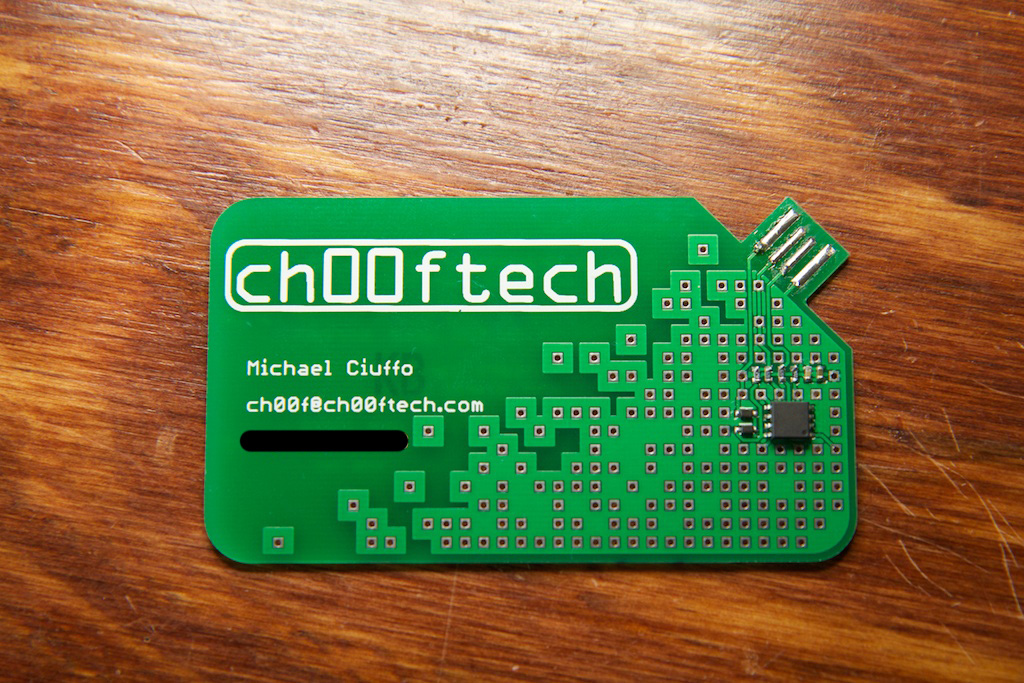
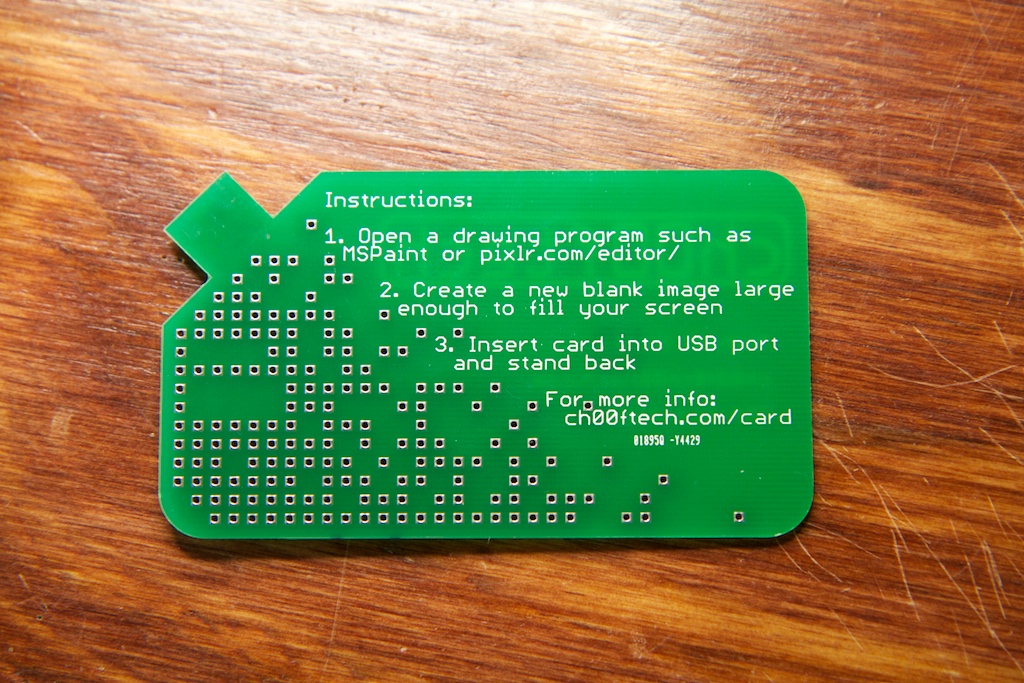
You might have noticed that I borrowed a lot of this design from Frank Zhao. He came up with the idea of obfuscating the programmer pins inside the design of the card. Six of the many exposed vias on the board connect to the six pins of the AVR programming header. The other hundred or so don't do anything at all.

Placing those vias was a blast.

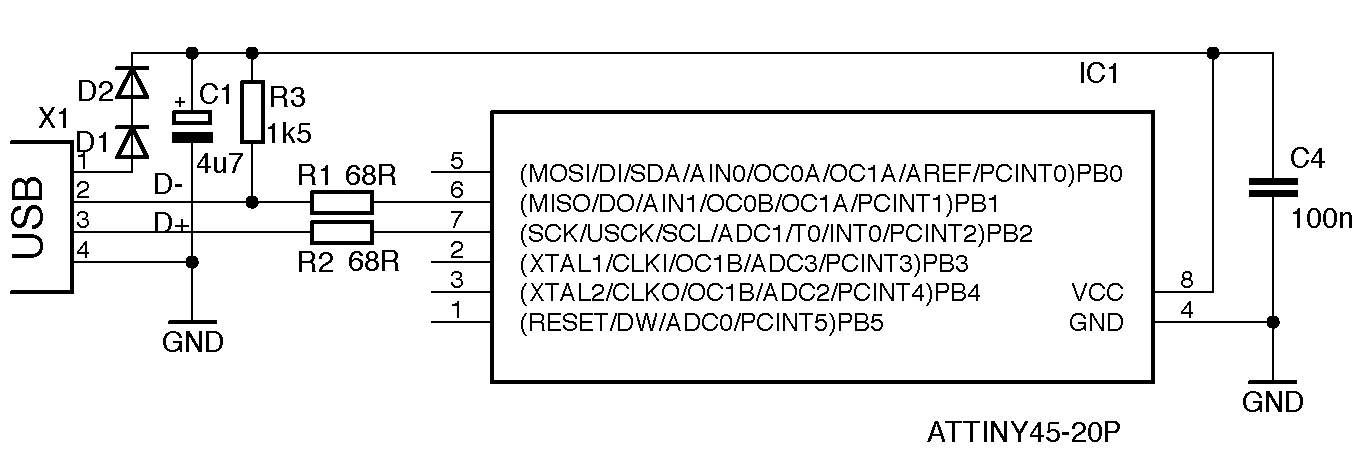
The card was programmed with this small helper circuit:


The device cannot be programmed while it's connected to USB, so the + and - leads let me power the board using an external power supply during programming. These supply leads bypassed the two diode drops coming from the 5V rail (see schematic below), so as long as I kept the external supply voltage high enough, I could actually keep it connected while I plugged the device into the USB port. The diodes wouldn't conduct unless their forward voltage was greater than their potential drop.


The USB connector was taken from SparkFun Connectors Eagle library. The PCB itself wasn't thick enough to seat the card properly, so I added some solder to the pins to thicken it up a bit. This still wasn't quite enough for some USB ports, so maybe next time I'll see about ordering thicker PCB.

Also, the dongle doesn't stick out far enough for some USB hubs, so in the next version, I'll make it longer.

I was surprised to find that the ATTin85 only comes in the wide version of SOIC-8 on Digikey. This is wider than my standard footprint, and I didn't realize until I had already received the PCBs. Fortunately, I got it to work with some creative soldering:


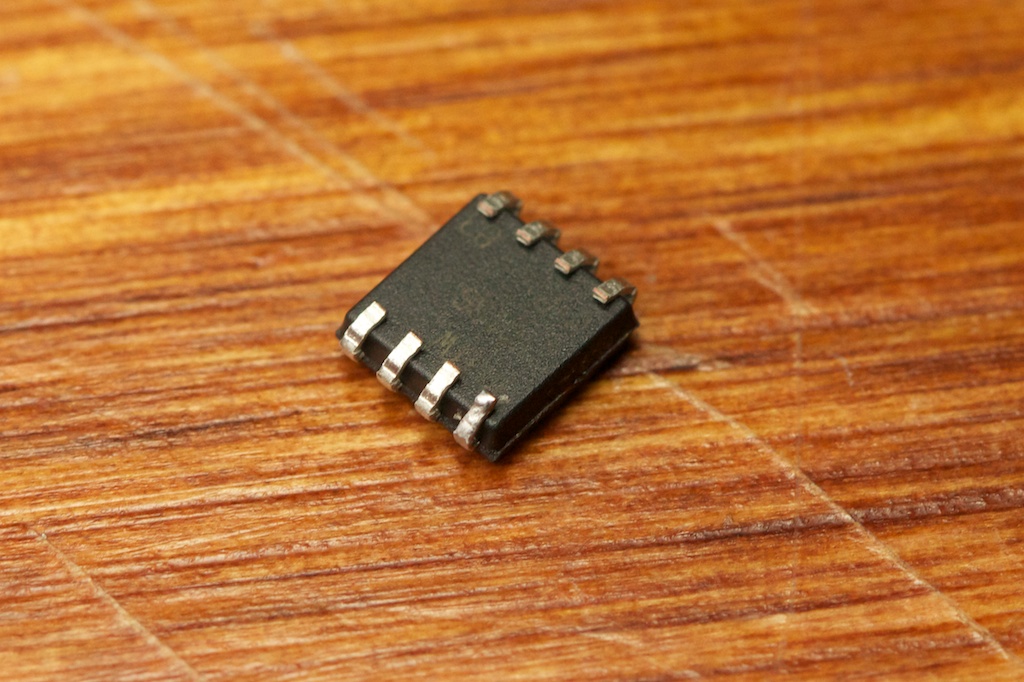
I fixed the footprint anyway for the next version. Fortunately, I didn't have to rearrange anything else to make room.

I also included a simple set of instructions on the back of the board. For most setups, the card should work on the first try, but I also included a URL to a small page that offers some troubleshooting tips as well reassurance that this thing won't immediately upload a virus as soon as it's connected.
Performance

As you can see in the video above, the card does more or less exactly what it's supposed to. I have also tested the firmware on OSX, but the USB port of my Mac (that's actually running OSX) is shaped so that the card itself won't fit right.

I don't anticipate it working immediately for everyone, but I figure that it'll still be a fun thing for the recipient to figure out. Besides, all of the important info is printed right on the card, so if nothing else, it's a neat looking card!

Project files can be found here: Business Card v2.0

DOS(PC) Emulator for RaspBerry Pi


rpix86 v0.03 released! - Dos(PC) Emulator for RaspBerry Pi Released
via Raspberry Pi News

Homebrew Coder Pate who first off released a DOS Emulator for the Nintendo DS, then moved onto the Android has now posted a release of his DOS Emulator for the Raspberry Pi. For those who don't know a Dos Emulator lets you play old PC Games such as Doom, Duke Nukem 3D, Theme park and similar games from that period, in short an excellent way to play old games on a new device that was never intended to run the game.

The current status of the emulation is as follows:

CPU: 80486 processor, including the protected mode features (for running DOS4GW games) but without virtual memory support. The emulation runs at a speed of around 20MHz 80486 (which equals a 40MHz 80386) machine. Memory: 640KB of low memory, 4MB of EMS memory and 16MB of XMS memory.Super-VGA graphics, with a maximum resolution of 640x480 with 256 colors. SoundBlaster 2.0 (including AdLib-compatible FM sounds) sound card. US keyboard.Two-button mouse.

Here's a couple of screens from the emulator:

First off one of the emulator at StartUP:


Heres a screen showing benchmarks (Notice that the Raspberry Pi even through emulation is much faster at this still early stage)

Heres the news from the latest release:

Okay, yet another version of rpix86 is now available! During the previous week I first debugged some issues with the Logitech K400 wireless mouse/keyboard combo USB device, with the help of a Raspberry Pi forum user Jessie. Big thanks for the help! I noticed that my event file detection and handling routines did not properly handle the situation where the same event file sends both keyboard and mouse events. I made some changes to the routines, in addition to adding the event file number overriding parameters in the previous 0.02 version. After some iterations we managed to get the event system working properly in rpix86. After that I then implemented some other changes and missing features. The complete list of changes is here:

Improved support for combined keyboard/mouse USB devices (for example Logitech K400). Fixed a problem in Mode-X STOSD opcode (fixes "Settlers" black screen). Implemented read from file directly to EGA VRAM ("Heimdall"). Fixed SB command DSP_RESET to stop auto-init DMA play ("Doom").

Next I think it is time for me to work on the ax86 version for a while. You can of course still send me bug reports and enhancement requests for rpix86, especially since over 95% of the code is shared between ax86 and rpix86. If a game misbehaves on one of them, it will almost certainly misbehave also in the other version, so all game-specific enhancements and fixes will affect both emulators.

For more information and downloads, click here!

Fully depleted silicon transistor are promising


Fully depleted silicon technology to underlie energy-efficient designs at 28 nm and beyond


fully_depleted_transistors_fig1ab


Fully depleted silicon transistor are much promising for future developments. Xavier Cauchy writes:

To date, transistor scaling has continued in accordance with Moore’s Law down to 32 nm. Engineering challenges, however, are forcing chipmakers to compromise performance and power efficiency in order to reach smaller nodes – unless they switch to new technologies that help better solve these challenges. Today, the semiconductor industry is starting to deploy such new technologies, largely relying on “fully-depleted” transistors for continued scaling and performance gains.

Fully depleted silicon technology to underlie energy-efficient designs at 28 nm and beyond - [Link]

Table top pick and place machine


TM220A table top pick and place overview

via Dangerous Prototypes

A pick and place is a machine that puts electronic components onto a circuit board that has been coated with solder paste. To complete the prototype you just place the populated PCB into a reflow oven. We hope it will speed up production of one-offs and single prototypes.

15Reels
The NeoDen TM220A is a table top pick and place designed and manufactured in China. Most PnPs are huge machines that take up a room, but this fits nicely in the workshop. It doesn’t require a separate compressor, it has a noisy internal vacuum pump that provides suction for lifting parts.

Up to 15 reels of components can be loaded. 12 x 8mm, 2 x 12mm, and 1 x 16mm. A tray at the front holds larger components like chips. The bigger TM240A that has twice as many reels and costs $1000 more. For us the TM220A is the ideal size. More importantly, it’s light enough to carry up two flights of steep stairs into the workshop.

IMG_0780-W600
Flip the switch to start the machine. You’re greeted by a short start-up sequence. The menu is separated into 3 tabs: ‘Tasks’, ‘Manual’, and ‘Setting’. The Tasks tab shows a list of placement files that can be run. The Manual tab has buttons to manually control and test most hardware.
Settings
The Settings menu controls the language (English or Chinese), speed, calibration, etc. In the video run at the lowest 10% speed setting. The higher settings the table and throws components around, after the video it’ll be moved to a workbench anchored in the corner of two walls.

You’ll need a manufacturer-supplied password to save any of these setting permanently. Our machine was supplied in Chinese mode, and we got the code to change it without difficulty. We have heard of cases where people were unable to get it though.

Dual Head
The most important thing for our workflow is to get the placement data out of Eagle as quickly as possible. It doesn’t make sense to spend an hour programming the machine to do a single prototype.

We’re working on a ULP to dump Eagle board files for the TM220A/TM240A with a few clicks. This is key to making the machine useful in our situation. Run the ULP, assign a reel (or no reel) to each component on the BOM, then export the placement file. Placement files are written to an SD card, the card is then stuck in a reader on the control panel of the TM220.

The TM220A has two placement heads. They can place two of a single part in one movement, or each can be fitted with a nozzle for a different size part. Our ULP doesn’t take advantage of this yet, but it could be added in the future.

Placement files are simple plaintext CSV files with lists of reels, parts to place, and position information. The wiki has more information on the format of the placement file and ULP.

LAser
The TM220A doesn’t have a vision system, it relies entirely on calibration and positioning. This means the board needs to be aligned flush with the machine’s coordinate center. In the manual control menu a button turns on a laser sight that shows the alignment of the PCB in the vice.

needle2
Parts are advanced by the pick and place head. It moves to the reel and a solenoid controlled needle pushes into the holes on the side of the reel. The entire pick and place head moves outwards to pull the part. The feed distance is defined per reel in the configuration file.

friction
While the pick and place head advances the reel one part, a set of friction wheels grab excess film from the part reels.

After the reel advances the head drops down and picks it up with vacuum and rotates it to the correct position. The head moves to the part’s location on the board and then drops it by removing the vacuum.

IMG_0799-W600
This is an example of the working screen showing the part’s reel location, coordinates on the board, rotation, height (which is usually 0), whether to skip it, and the description on the board. This is all defined by the format shown on the wiki.

Conclusions

We’re withholding judgement until our easy-export ULP is working. Our goal is to save time by quickly placing common parts on single prototypes. There’s a lot more room for error and hand adjustment than on a manufacturing run, even if it isn’t perfect for high volume work it will still probably be a useful tool for us.

The value of a top and bottom vision system that compensates for misalignment is immediately apparent. This machine depends entirely on calibration and registration. Maybe someone will develop an open source add-on for these cheap machines.

As always, we caution against buying a pick and place to manufacture your first open hardware project, especially a cheap machine. Many small startups regret the time and effort invested get fairly mediocre results. Running a production line is a whole additional job. If you’re doing your first hundred or thousand board we recommend contacting local assembly houses. You don’t have to go to China, there’s assembly places everywhere, including the US.

CNC Uses Raspberry Pi and Alamode


Network Enabled ShapeOko CNC Uses Raspberry Pi and Alamode
via Makezine Blog


Anyone familiar with CNC routers knows they generate a lot of dust. Most machines also require a dedicated computer to run them, which usually gets filled with that dust. Kevin Osborn from Wyolum got tired of this never ending cycle and used a Raspberry Pi and AlaMode shield (available in the Maker Shed) to network enable his ShapeOko CNC machine. This way he can box up the electronics, send G-Code wirelessly over his network. The Raspberry Pi then controls the machine leaving his good computer clean and available for other tasks.


The Raspberry Pi acts as the host for the system and loads the G-Code into the AlaMode running GRBL, an open source CNC control program from Synthetos. The grblShield then amplifies the pulses and drives the stepper motors on the ShapeOko. According to Kevin, “this is of the simplest and most rewarding applications of AlaMode.” While there is only an initial overview of the system on the Wyolum site, Kevin promises to have more details and a how-to for sending G-Code over the network available shortly. I’m looking forward to it!

XBMC for Pi has now launched a “1.0″stable version


Raspbmc hits final #piday #raspberrypi @Raspberry_Pi
by Admin


One of the three primary flavors of XBMC (Xbox Media Center) built for the Raspberry Pi has now launched a “1.0″ stable version after a year of development. From Raspbmc.com:


After much delay, it’s finally here! Last Sunday was the 1 year birthday of Raspbmc, which I announced on the 2nd February 2012. It’s rather fantastic, that within a year, we’ve gone from not even having the hardware, let alone a usable software platform, to a stable and well refined product. It wasn’t always the smoothest ride in the world. With early firmware, untested kernels and alpha builds of software, you’re going to have ‘interesting’ results to say the least. In the final release, we’re introducing a few extra features:
  • Raspbmc can now detect unstable power supplies and unsafe shutdowns.
  • Language selection
  • XBMC 12 Final with improved 1080p DTS software decoding (Thanks Dom)
  • Better Hama remote control support (supporting this thing is a real headache)
  • A more streamlined approach to the handling of USB mounting
  • Logs written to RAM to decrease SD IO

For the full Raspbmc feature list head on over to Raspbmc.com

Read more.

OpenSCAD Tips

OpenSCAD Design Tips: How to Make a Customizable Thing

via Makerbot Blog
You can customize this awesome cube right now!


Blogger and OpenSCAD superuser MakerBlock introduced an excellent template object and tutorial to help teach Thingiverse users how to take advantage of the MakerBot Customizer. If you haven’t tried the Customizer yet — Tony Buser‘s inspiring CloudSCAD project to bring the open source parametric design tool OpenSCAD to the web, now reborn with further development as the MakerBot Customizer — then perhaps learning how you can create your own parametric objects to share will be a great incentive to click through the steps to authorize the Customizer app on your Thingiverse account so that you can play along.

MakerBot has also launched a challenge from now until March 8th to award MakerBot Replicator 2X printers for the best Customizer projects in these three categories: Useful, Wearable, and Artistic.

From the MakerBot Blog:
Chances are you’ve been following along with the newest developments over on Thingiverse and have seen people uploading “Customizable” versions of their OpenSCAD designs. (For the latest information on how to make a customizable thing using the Customizer you’re going to want to check out the documentation for this Thingiverse app. Since you have to authorize the App to be able to use it, there’s no way at the moment for me to provide a direct link to the documentation.)

If you’d like to give the Thingiverse Customizer a shot but aren’t sure where to begin, this tutorial is for you. Before you get bogged down in the details, just know that I’ve created a “Customizer template” you can use as a starting point for creating your own customizable Thing. I would suggest first playing with the settings in this template to see how Customizer changes the object. Then, when you’ve gotten the hang of it, read through this tutorial on how to make a Customizable OpenSCAD file. Finally, download and check out the template itself in your favorite text editor or OpenSCAD. Add your own designs and see how you can make your own customizable Things!

Read more.

APRS iGate

APRS iGate built using a Raspberry Pi

via Hack a Day by Mike Szczys


The hardware seen above is used to bridge a local RF radio network to the APRS-IS network. The APRS-IS is an Internet Service that uses a web connection to communicate between APRS networks in different parts of the world. The Raspberry Pi is perfect for this application because of its ability to connect to a network, and its native use of Linux.

On the software side the majority of the work is done by a Python script. It is responsible for setting up and monitoring a connection with an APRS-IS server. To connect to the handheld radio unit a USB sound card was used. TheMultimon package is used to send and receive audio packets through this hardware.

[Sunny] has a few upgrades planned for the system. The device needs to report its location to the APRS-IS server and the plan is to add functionality that will look of the WiFi AP’s location automatically. It may also be possible to get rid of the radio all together and use a DVB dongle as a software defined radio.

Kindle Paperwhite


How the Kindle Paperwhite Works

via NYTimes.com

Adafruit 961


How the Kindle Paperwhite Works – Graphic – NYTimes.com.

The Kindle Paperwhite uses a unique lighting system to illuminate its electronic ink display. Rather than using a backlight as on LCD-based tablets, the Paperwhite uses a transparent light guide that directs light from four edge-mounted LEDs down toward the surface of the display.

A GUI for AVRDUDE

AVRDUDESS – A GUI for AVRDUDEby Admin


AVRDUDESS is a GUI for AVRDUDE, a tool for programming Atmel microcontrollers.
Some key features:
  • Supports all programmers and MCUs that AVRDUDE supports
  • Supports presets, allowing you to change between devices and configurations quickly and easily
  • Drag and drop files for easy uploading
  • Automatically lists available COM ports

Learn more and download here.

Pi as a Squeezebox server


Raspberry Pi a Squeezebox Logitech Server

via Jacken's Blog


Here’s a tutorial for using your Pi as a Squeezebox server from Jacken:

I love my music playback setup that consists of a couple of Squeezebox V3 players in different rooms so I can listen to music in lossless format wherever I am in the apartment. With the iPeng HD app on my iPad, I have a nice interface for controlling the players with album art and other nice features. But the best part is that I can playback high resolution audio directly on my iPad using the Camera Kit USB adapter and an HRT Headstreamer DAC portable USB headphone amplifier. But I wanted a small, cheap and eco-friendly server for hosting my music files and wondered if I could use the Raspberry Pi. And here’s my findings.

Read more.

Resistor Cheat Sheet


Red Green Resistor Cheat Sheet

Just a little hint for the people with Dyschromatopsie